Begin your collection with 15% off your first publication — Use code: WELCOME15
Setting the Table:
How to Prepare Your Creative Space Before the First Snip
CREATIVE LIFE & MINDSET
Sandy Lowdermilk
5/27/20266 min read

There's a moment — you probably know it — when you sit down at your creative space, pull out a beautiful piece of vintage paper, and then spend the next twenty minutes hunting for your scissors. Or discovering that your adhesive dried out. Or realizing the light is wrong and everything looks gray and flat and nothing like the vision in your head.
That moment is not a creativity problem. It's a table problem.
I've been making art long enough to know that what happens before the first snip matters just as much as what happens after it. The way a chef sets her mise en place before she ever turns on the flame. The way a painter lays out her palette before she touches the canvas. There is a reason we call it setting the table. It's an act of intention. Of care. Of telling yourself: what I'm about to do matters.
So today I want to walk you through the five things I do before I begin any junk journal session. Not because I'm precious about process — anyone who's read my Crafter's Confession knows I am decidedly not — but because these small rituals have quietly transformed the way I work. They lower the friction. They raise the joy. And they get me into that soft, focused, unhurried creative state so much faster than just diving in.
Think of this as setting your own table.
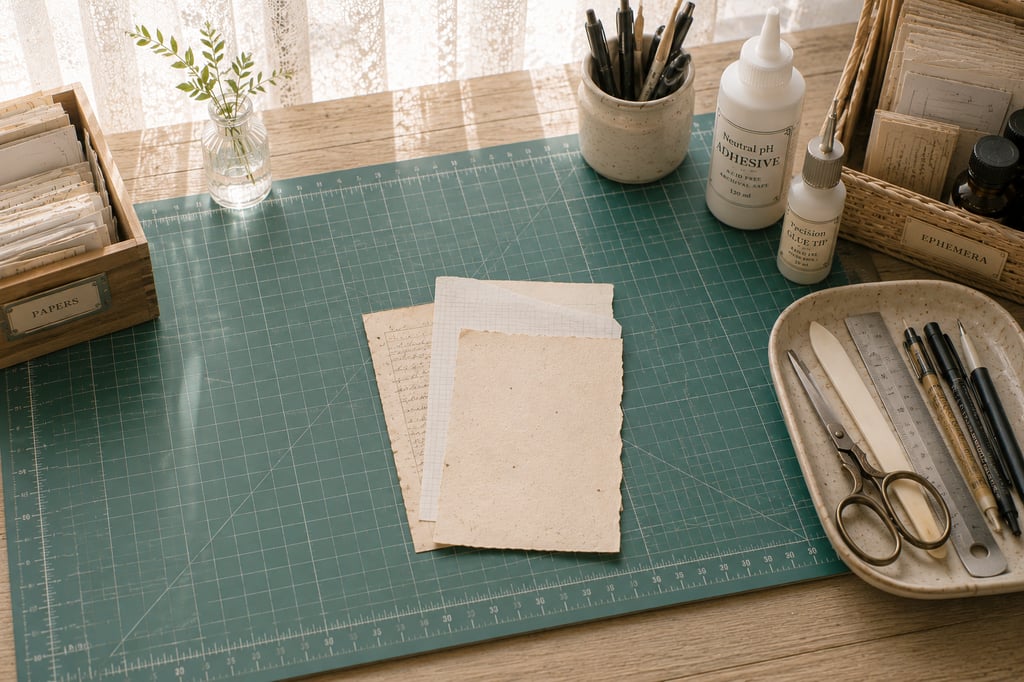
Setting 01: Your Surface
Before anything touches it, clear it.
I know that sounds obvious. But I mean really clear it. Not "push things to the side" clear. Not "stack the mail on the chair" clear. Actually, genuinely clear.
Your creative surface is your first canvas. It sets the visual and psychological tone for everything that follows. When I sit down to a cluttered table, my mind stays cluttered too — I'm mentally cataloguing the chaos instead of sinking into the work. When the surface is clean, something in me settles.
Once it's clear, I protect it. A self-healing cutting mat is non-negotiable for me, but even a piece of kraft paper or an old linen placemat works beautifully. Something that says: this space is ready.
Then — and this is my favorite part — I make it mine. A small vase with something living. An aromatherapy diffuser releasing something warm and grounding — lavender, sandalwood, a little bergamot. A single beautiful object that has nothing to do with the project but everything to do with how I want to feel while I'm working. Don't skip this part. It's not decoration. It's a signal to your nervous system that you're allowed to be here, making things, for a little while.
Setting 02: Your Light
Color is light. If your light is wrong, your color decisions will be wrong — and you won't know why until the finished page looks nothing like what you imagined.
I am deeply particular about this.
Natural light from a north-facing window is the gold standard for color accuracy, but most of us don't have that luxury at 9pm with a glass of wine and two hours to ourselves. So: a warm daylight bulb (somewhere in the 4000–5000K range) placed to your non-dominant side is your next best option. It mimics the diffused, even light that makes neutral palettes sing — the way a dusty rose reads as rose and not brown, the way ivory separates cleanly from cream.
This matters especially if you're working with the kinds of neutral, layered palettes we've talked about in The Magic of Neutral Palettes* and Less Is More*. Those palettes live and die by light. Give them good light and they glow. Give them a yellow overhead bulb and they all turn the same muddy beige.
Take two minutes. Fix your light. Your future self will thank you.
Setting 03: Your Tools
Here is the rule I follow without exception: only put out what you'll actually reach for today.
Not your full collection. Not every adhesive you own. Not the scissors you keep just in case. Today's tools, for today's project.
I keep a small tray — an old transferware plate I found at an estate sale, naturally — and before each session I fill it with only what I need. A bone folder. My good scissors. Whatever adhesive the project calls for. A ruler if I'm trimming. A pen if I'm writing. That's it. And I always place the tray beside my dominant hand — no reaching across the work to retrieve something, no accidentally dragging a sleeve through a freshly glued piece, no scissors clattering down onto a page you've been nursing for twenty minutes.
When your tools are curated and positioned well, you move faster. You decide faster. You don't spend creative energy managing options — you spend it making things. The How to Start a Junk Journal From Scratch I wrote a last week talks about the tools worth investing in, but honestly the more important skill is learning to leave most of them in the drawer.
The tray also serves a practical function: when the session is over, everything goes back on the tray. No hunting next time. No dried-out adhesive. Just a little plate waiting for you, ready.
Setting 04: Your Palette Anchor
Before anything touches the page, I make one color decision.
Just one. A single swatch, a torn scrap of paper, a piece of ribbon or fabric that says: this is the feeling we're working toward today. I set it in the upper left corner of my workspace — the place my eyes naturally land when I look up — and I don't move it.
Everything I reach for during the session gets held up against that anchor. Does this cream play nicely with that warm ivory? Does this aged green belong in the same conversation as this dusty blush? The anchor doesn't limit you. It focuses you. It's the difference between a palette that feels intentional and one that feels like you grabbed whatever was nearby.
If you've worked through the 10-minute color planning ritual from Less Is More*, you already know how to do this in your sleep. If you haven't, that post is a good companion to this one.
My kits are designed to do this work for you — every piece in a collection was chosen to live together, which means when you pull from a single kit, you already have a palette anchor built in. The work of deciding is already done. You just begin.
Setting 05: Your Inspiration Anchor
This is the most personal of the five settings, and the one I feel most strongly about.
Before I begin, I place one object — one single thing — somewhere I'll see it throughout the session. Not a mood board. Not a Pinterest print-out. One thing.
Sometimes it's a postcard. Sometimes it's a pressed flower or a piece of bark or a button that belonged to my grandmother. Sometimes it's a small print of a Monet — that particular blue-green of the water at Giverny, that quality of light he was always chasing. What Monet Taught Me About Making Art* gets into this more deeply, but the short version is: he wasn't painting water lilies. He was painting light, and memory, and the feeling of an afternoon dissolving into evening. That's what I want my pages to do too.
The inspiration anchor isn't a directive. It doesn't tell you what to make. It just holds the emotional temperature of the session — a reminder of the feeling you're after, sitting quietly at the edge of your workspace while you work.
Choose something small. Something true. Something that requires no explanation but speaks to you anyway.
Before You Begin: Three Minutes of Quiet
Once the table is set — surface clear, light good, tools curated, anchors in place — I give myself three minutes before I touch anything.
I'm not being dramatic. I'm not meditating in any formal sense. I'm just sitting with the space I've created, letting my mind slow down from the pace of the day, letting my eyes rest on the beautiful things I've gathered.
It is extraordinary how much this changes the quality of what follows. The work is looser. More intuitive. Less forced. It's the difference between rushing to a dinner table still half-distracted by your phone and actually arriving — settling into the chair, noticing the candlelight, tasting what's in front of you.
You went to the trouble of setting the table. Sit at it for a moment before you begin.
Your workspace is the first page of every journal you'll ever make. It deserves the same care and intention you give to the pages themselves.
If you're just starting out and the idea of building a workspace from scratch feels overwhelming, that's exactly what my kits are designed for — everything curated, everything coordinated, everything ready. You bring the table and the quiet. I'll bring the beautiful things to fill it.
Browse the current collections at starphoenixstudio.com — and if you make something, I always want to see it.
With warmth,
Sandy
*These posts are coming soon. Please check back — I'd love to see you here again.